Description
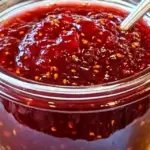
This Raspberry Hot Pepper Jelly combines sweet raspberries with spicy peppers for a versatile condiment perfect for spreading, dipping, or glazing meats.
Ingredients
Scale
Ingredients List
Here’s everything you’ll need to make Raspberry Hot Pepper Jelly:
For the Jelly:
- 2 cups raspberries (fresh or frozen, thawed and drained)
- 3–4 hot peppers (such as jalapeños, habaneros, or serranos), seeded and finely chopped
- 6 cups granulated sugar
- 1 cup white vinegar (or apple cider vinegar)
- 1 packet (1.75 oz) powdered fruit pectin
- 1/2 cup water
- Optional Add-ins: A pinch of salt, fresh herbs like thyme or rosemary for extra flavor
Instructions
Step 1: Prepare the Ingredients
- Chop the peppers: Begin by washing and drying the hot peppers thoroughly. If you’re using jalapeños, habaneros, or serranos, it’s essential to remove the seeds to reduce the intensity of the heat, unless you prefer a spicier jelly. Once the seeds are removed, finely chop the peppers into small pieces. Wearing gloves during this step is highly recommended to prevent irritation from the capsaicin.
- Mash the raspberries: Place the fresh raspberries in a large bowl and mash them with a fork or potato masher until they form a thick, pulpy consistency. If you prefer a seedless jelly, you can strain the raspberries through a cheesecloth or fine mesh sieve to remove the seeds. This is optional but creates a smoother jelly texture.
- Measure out the sugar and vinegar: Since this recipe moves quickly, it’s essential to have all ingredients measured and ready to go. Measure out 6 cups of granulated sugar and 1 cup of white vinegar. The vinegar adds acidity, which balances the sweetness and enhances the flavor of the jelly.
Step 2: Cook the Jelly Base
- In a large pot, combine the mashed raspberries, chopped peppers, white vinegar, and water. Stir the ingredients together over medium-high heat until they come to a boil. Keep stirring the mixture to prevent it from sticking to the bottom of the pot and ensure even heating.
- Once the mixture is boiling, gradually add the powdered pectin while stirring continuously. This ensures the pectin is evenly distributed and helps the jelly set properly. Continue cooking the mixture for about 1-2 minutes, allowing the pectin to dissolve completely.
- Tip: The acidity from the vinegar not only adds tanginess but also plays a critical role in activating the pectin, ensuring the jelly sets with the desired consistency.
Step 3: Add Sugar and Boil
- Once the pectin has dissolved, it’s time to add the sugar. Slowly pour in the 6 cups of sugar while stirring constantly. This may seem like a lot of sugar, but it is crucial for balancing the heat from the peppers and helping the jelly set.
- Continue stirring the mixture over medium-high heat until it returns to a full rolling boil. A rolling boil is a vigorous boil that cannot be stirred down. Once the mixture reaches this stage, allow it to boil for 1-2 minutes, then remove it from heat.
- Tip: Use a candy or jelly thermometer to monitor the temperature of the jelly. You want the jelly to reach 220°F (104°C), which is the temperature at which jelly sets. If you don’t have a thermometer, you can use the cold spoon test: dip a spoon in the hot jelly, hold it up, and if the jelly drips off in sheets rather than single droplets, it’s ready.
Step 4: Skim Foam and Fill Jars
- After the jelly reaches the desired temperature, remove it from the heat. You may notice foam has formed on the surface of the jelly during cooking. This foam is harmless but can affect the appearance of the jelly. Use a spoon or ladle to skim off the foam and discard it.
- Using a funnel and ladle, carefully transfer the hot jelly into your prepared, sterilized canning jars. Fill each jar, leaving about ¼ inch of headspace at the top. The headspace is essential for proper sealing during the canning process.
- Tip: Wipe the rims of the jars with a damp cloth to remove any jelly residue. This ensures a clean seal when you apply the lids.
Step 5: Seal the Jars and Process in a Water Bath
- After filling the jars, place the sterilized lids on top and screw the bands on just until finger-tight. You don’t need to over-tighten the lids, as air needs to escape during the canning process.
- Carefully place the jars in a large pot or canner filled with boiling water. Make sure the water covers the jars by at least 1-2 inches. Boil the jars in the water bath for 10 minutes (adjusting for altitude if necessary).
- After the processing time is complete, use a jar lifter or tongs to remove the jars from the boiling water and place them on a towel or heat-safe surface to cool. As the jars cool, you’ll hear the lids pop, indicating that they’ve sealed correctly.
- Tip: Allow the jars to sit undisturbed for 24 hours. Afterward, check the seals by pressing the center of the lid. If it doesn’t flex or pop back, the jar is sealed correctly. If it does, you’ll need to reprocess or refrigerate that jar and use it first.
Step 6: Label and Store the Jelly
- Once the jars have cooled and the lids are sealed, it’s time to label your jars with the date and contents. This is especially important if you plan to store the jelly for an extended period or give it as a gift.
- Store the sealed jars in a cool, dark place like a pantry or cupboard. Properly sealed jelly can last for up to 12 months. Once opened, refrigerate and use within a few weeks.
Notes
Tips for Perfect Raspberry Hot Pepper Jelly
1. Use the Cold Plate Test
- If you don’t have a jelly thermometer, you can use the cold plate test to check if your jelly is ready. Place a small plate in the freezer before you start cooking the jelly. Once you think the jelly has reached the proper consistency, spoon a little onto the cold plate. Wait for about 30 seconds, then gently push the jelly with your finger. If it wrinkles and holds its shape, it’s ready. If not, cook it for a couple more minutes and test again.
2. Stir Constantly After Adding Sugar
- Once you add the sugar to the mixture, stir it constantly to prevent it from sticking to the bottom of the pot and burning. A burnt sugar flavor can overwhelm the delicate balance of sweet and spicy, ruining the jelly.
3. Customize Your Peppers
- For a personalized touch, experiment with different types of peppers. Jalapeños add moderate heat, habaneros bring intense spiciness, while poblanos or bell peppers give a mild flavor. Adjust the pepper-to-raspberry ratio to find your ideal balance.
4. Maintain Proper Headspace
- When filling your jars, make sure to leave about ¼ inch of headspace at the top. This small gap allows for the proper sealing of the jars during the canning process. Without enough headspace, the jars may not seal correctly, and too much headspace can prevent the vacuum seal from forming.
5. Test the Seal After Cooling
- Once your jars have cooled, press down on the center of each lid. If the lid pops or moves up and down, the jar didn’t seal properly. In this case, you can either reprocess the jar using the water bath method or store it in the refrigerator and use it within a couple of weeks.