Description
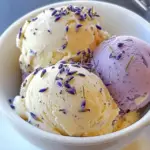
Honey Lavender Ice Cream is a sophisticated and refreshing dessert that combines the delicate floral notes of lavender with the rich sweetness of honey. This unique flavor pairing offers a gourmet twist on traditional ice cream, making it a perfect treat for those who appreciate the finer things in life. As floral flavors gain popularity in the culinary world, this ice cream stands out as an elegant and aromatic option that can elevate any occasion.
Ingredients
Ingredients List (with measurements)
Here’s what you’ll need to make Honey Lavender Ice Cream:
- 2 cups heavy cream
- 1 cup whole milk
- 1/2 cup honey
- 2 tablespoons dried culinary lavender
- 5 large egg yolks
- 1/4 teaspoon vanilla extract
These simple ingredients come together to create a complex and delightful flavor profile. The richness of the cream and milk provides a smooth base, while the honey and lavender add natural sweetness and aromatic depth.
Instructions
Step-by-Step Instructions
Follow these steps to create your own batch of Honey Lavender Ice Cream:
- Prepare the lavender infusion: In a medium saucepan, combine 2 cups of heavy cream and 1 cup of whole milk. Add 2 tablespoons of dried culinary lavender and bring the mixture to a gentle simmer over medium heat. Once it starts simmering, remove the saucepan from the heat and let the lavender steep for 20 minutes to infuse the cream with its floral aroma.
- Strain and heat the mixture: After 20 minutes, strain the lavender from the milk and cream mixture using a fine mesh strainer. Return the liquid to the saucepan and gently reheat it over low heat until it’s warm, but not boiling.
- Whisk the egg yolks: In a separate mixing bowl, whisk together 5 large egg yolks until they become light and fluffy. Gradually add 1/2 cup of honey while continuing to whisk until fully incorporated and smooth.
- Temper the egg mixture: To prevent the egg yolks from curdling, slowly pour the warm milk mixture into the egg yolks in a thin stream, whisking constantly. This process is known as tempering and helps gradually raise the temperature of the eggs without cooking them.
- Cook the custard: Pour the combined mixture back into the saucepan and cook over medium heat, stirring constantly with a wooden spoon or spatula, until the custard thickens enough to coat the back of the spoon (170°F to 175°F). Be careful not to let the mixture boil, as this can cause the custard to curdle.
- Chill the custard: Remove the custard from heat and stir in 1/4 teaspoon of vanilla extract. Pour the custard into a mixing bowl and cover the surface with plastic wrap to prevent a skin from forming. Refrigerate the custard for at least 4 hours, or preferably overnight, until it’s thoroughly chilled.
- Churn the ice cream: Once the custard is chilled, pour it into an ice cream maker and churn according to the manufacturer’s instructions, usually about 20-25 minutes, until the mixture reaches a soft-serve consistency.
- Freeze the ice cream: Transfer the churned ice cream to a freezer-safe container, smoothing the top with a spatula. Press plastic wrap directly onto the surface of the ice cream to prevent ice crystals from forming. Cover with the container’s lid and freeze for at least 2 hours before serving.
Notes
Notes on Storing Homemade Ice Cream
Proper storage is essential to maintain the creamy texture and rich flavor of your Honey Lavender Ice Cream:
- Use Airtight Containers: Store the ice cream in a freezer-safe, airtight container. Press a piece of plastic wrap directly onto the surface of the ice cream before sealing the lid to prevent ice crystals from forming.
- Optimal Freezing Temperature: Keep the ice cream in the coldest part of your freezer, usually towards the back, to maintain a consistent temperature and prevent melting and refreezing, which can cause ice crystals.
- Shelf Life: Homemade ice cream is best enjoyed within 1-2 weeks of making it. After this period, it may start to lose its creamy texture and develop freezer burn.