Description
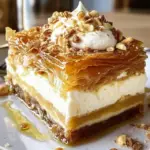
Discover the best Honey Baklava Cheesecake recipe, a perfect fusion of creamy cheesecake and crispy, nutty baklava, finished with a drizzle of honey syrup. Perfect for any occasion!
Ingredients
Ingredients List
For the Baklava Layer:
- 1 package of phyllo dough (16–18 sheets), thawed if frozen
- 1 cup unsalted butter, melted
- 2 cups mixed nuts (walnuts, pistachios, almonds), finely chopped
- 2 teaspoons ground cinnamon
- ½ teaspoon ground cloves
For the Cheesecake Filling:
- 3 (8 oz) packages of cream cheese, softened
- 1 cup granulated sugar
- ¼ cup honey
- 1 teaspoon vanilla extract
- 3 large eggs
- ½ cup sour cream
For the Honey Syrup:
- 1 cup honey
- ½ cup water
- 1 tablespoon lemon juice
- 1 cinnamon stick
Optional Garnishes:
- Crushed pistachios
- Drizzle of extra honey
Instructions
Step-by-step Instructions
Step 1: Prepare the Nut Mixture
Start by preparing the nut mixture for the baklava layer. Finely chop the walnuts, pistachios, and almonds in a food processor. Combine the chopped nuts with ground cinnamon and cloves in a large bowl. Set the mixture aside.
Step 2: Layer the Phyllo Dough
Preheat your oven to 325°F (160°C). In a 9-inch springform pan, begin layering half of the phyllo dough sheets, brushing each sheet generously with melted butter. Lay one sheet at a time, brushing butter between each layer to create a crisp and golden base.
Step 3: Add the Nut Filling
Once half the phyllo layers are down, evenly spread the nut mixture over the phyllo. Be sure to cover the entire surface to create a thick, crunchy layer.
Step 4: Layer the Remaining Phyllo Dough
Continue layering the remaining phyllo sheets on top of the nut mixture, brushing each layer with melted butter. Once all layers are added, lightly score the top with a sharp knife to make cutting easier after baking.
Step 5: Pre-bake the Baklava Layer
Place the springform pan on a baking sheet and pre-bake the phyllo dough and nut layers for 15 minutes to ensure the crust stays crispy.
Step 6: Prepare the Cheesecake Filling
While the baklava layer bakes, prepare the cheesecake filling. Beat the cream cheese, sugar, honey, and vanilla extract in a large bowl until smooth and creamy. Add the eggs one at a time, beating after each addition. Finally, stir in the sour cream until well combined.
Notes
Storing and Reheating Honey Baklava Cheesecake
One of the great things about Honey Baklava Cheesecake is that it stores well, making it a perfect dessert to prepare ahead of time. Proper storage ensures that the cheesecake retains its texture, flavor, and freshness.
How to Store Honey Baklava Cheesecake
1. Refrigeration
- Short-term storage: Once the cheesecake has been properly chilled and served, any leftovers should be refrigerated. To store, cover the cheesecake tightly with plastic wrap or foil to prevent it from drying out or absorbing odors from other foods in the refrigerator. It will stay fresh for up to 4-5 days in the fridge.
- Individual slices: For convenience, you can also store individual slices in airtight containers. This makes it easy to serve a single portion without exposing the entire cheesecake to air every time.
2. Freezing
-
Long-term storage: If you want to store the cheesecake for a longer period, it can be frozen. Freezing Honey Baklava Cheesecake is a great option if you’re planning for future events or just want to enjoy it later.
- Whole cheesecake: To freeze the entire cheesecake, first allow it to chill fully in the refrigerator. Then, wrap it tightly in plastic wrap, followed by a layer of aluminum foil to prevent freezer burn. It can be frozen for up to 2-3 months.
- Individual slices: Alternatively, freeze individual slices by wrapping each piece in plastic wrap and placing them in freezer-safe bags. This makes for easy, portion-controlled desserts when you need them.